Well first of all I must say a big thank you for all of your kind comments. Everyone who posts on all the blogs will be enterd into the draw for the blog candy.
Well the week didn’t start well as my son didn’t pass his test, so it is more practising and a retest in 2 weeks, so the success of the blog hop today has lightened my mood. Apart from a minor glitch with one on my links ( which I am pleased to say I managed to sort out without having to ask my fellow Pootlers for help!) it all seems to have gone really well.
so my next project is a different shaped gift box which I made some time ago hoping that I would get around to videoing how to, but just haven’t had time to yet as I am having to juggle full time work with two growing boys and working away from home three days a week! Still, I hope that the instructions make sense….
I used Crisp Canteloupe cardstock (in colour 2014-2016)(131303)
 To make you will need two pieces of card one 4.5 x4.5 inches and a second 7 1/2x 3 1/8, one piece of window sheet 2 x2 inches and 2 pieces of Designer Series Paper (DSP) one 2 3/4 inches square cut into 2 diagonally and another 1 7/8 x 4 1/8 inches.
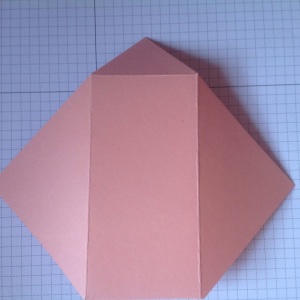
take the square piece of card and mark 1.5 inches across and down in the top left and bottom right corners. Use a ruler (or the diagonal score plate) to score between the 4 points. Then cut off ONE of the small triangles. Stick the DSP onto the front leaving a small border all around.
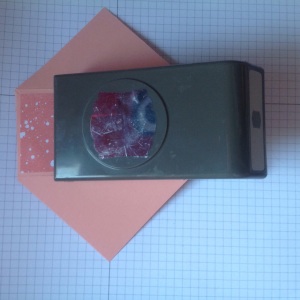
Fold over the other small triangle and using the artisan label punch (130920) to punch out a window. (I find myself using this punch and the matching tag stamps Label Love (130622) over and over again) Although on this example you will see I did a really rubbish job of lining it up!
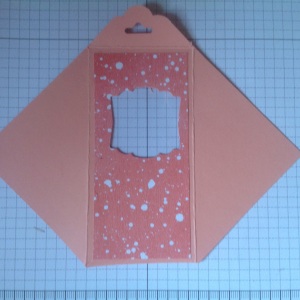
Turn over and stick the window sheet (114323) inside using red tape ( you need this super sticky tape to hold it in place
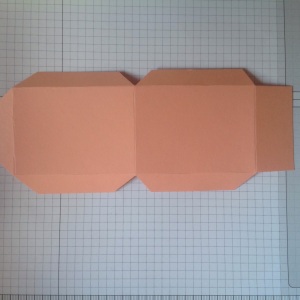
take the rectangular piece of card and score the long side at 1/2, 3 1/2 and 6 1/2 inches. Score the short side at 1/2 inch and 2 5/8 (or turn through 180 degrees and score again at 1/2 inch). Fold and burnish the score lines.
Trim the corners as shown below
Take the front panel and use the tag topper punch to shape the point. This is easiest if you turn the punch over and line up the card from underneath.
Attach the smallest tab to the bottom of the front panel (the end furthest from the window) and glue along the side panel. Attach the triangles of DSP to the sides and fold up to close. Trim the top tabs to match and punch a hole through the top to close with ribbon. I used crisp Canteloupe ink to stamp the label and attached with dimensionals and used the free Sale a Bration embellishment ribbon in calypso coral to close. Fill with goodies and gift!
I hope you have enjoyed this project. All supplies are available from my Stampin Up shop and don’t forget it is Sale a Bration, so for every£45 you spend you can choose a fabulous free gift, including stamps, papers and embellishments. If you are splashing out a bit more, then for only £99 you can join my team of flutterbies and can choose £130 of Stampin Up products and get a discount on your future purchases too by becoming a demonstrator. If you are making a purchase please use the hostess code and allow me to contact you so that I can send you a card and gift, if you are spending over £150 then you don’t use the code as you will qualify for your own hostess rewards!


