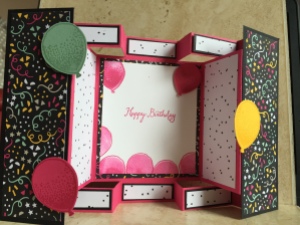
So this is a card design that I made for a recent class with other demonstrators. All of the instructions for this style card I have found used 12 inch cardstock, so I have created one using UK A4 card (which also suits US A4) I have made two versions – one with the retired It’s my Party DSP and the second using the Traveller stamp set – just to show how the use of stamping and DSP makes very different cards – but using the same card base. I have created a table showing all the pieces of DSP and card you need to make the Traveller version. I was going to make a video, but on the first attempt, my battery died, on the second attempt my son came in making a noise, and then my neighbours decided to drill constantly for the next two hours! So at that point I decided it wasn’t to be…. Hope you understand! Hopefully I’ll add a video later on.
Materials
1~1/2 sheets of A4 card in your chosen colour for the base card
1 Sheet of A4 Whisper White card (if doing stamped panels)
1/2 Sheet DSP or contrast card
Punches: circle punches two sizes I used 1-1/2 inch and 1-3/4 inch , but you could also use Framelits instead
Instructions
First cut and score your A4 piece of card to make the folded base. Refer to the plan below. The dashed lines represent score lines and the solid lines are cut lines.
I have put all the vertical cutting lines in cms as the measure on the SU trimmer where the cutter is housed is only in CM
Cut one piece of A4 coloured card for base 11 ½ x 6” .
Put card into trimmer with the short edge at the top (Portrait)
Make the following CUTS
Line up at 1 inch and cut from 1.8 cm to 12cm (¾ to 4 ¾ inches ) lift up cutter and cut again from 17 to 27.2 cm (6 ¾ – 10 ¾ )
Turn through 180° and line up at 5 inches and repeat cut from 2cm to 12 cm and from 17 to 27.3cm
Next you are going to SCORE
Put card in the trimmer with the long edge at the top (Landscape) and make the following SCORES
At ¾ inch top and bottom only (above top score line and below bottom score line only)
At 1 ¾ all the way top to bottom
At 3 ¾ all the way top to bottom
At 4 ¾ inch top and bottom only (above and below score line)
At 6 ¾ inch top and bottom only (above top score line and below boltom score line only)
7 ¾ all the way top to bottom
9 ¾ all the way top to bottom
10 ¾ top and bottom only
Your piece should look like the diagram below.
Fold the scores from the left M – V – M – V V – M – V – M
Mountain fold pointing up ; V = valley fold – fold pointing down
Cut two panel D out of the ½ sheet of cardstock that matches your DSP
Adhere these to the left and right front panels, lining up with the first score line – then adhere DSP to the panels.
Stamping
There are three panels to stamp – the centre panel and the two front panels
You will need to use your scraps to stamp and punch the images for the three panels on the front.
For the front panels, I used both first and second generation stamping of the images to get some variety in the background – including stamping off the edge. You might want to sponge around the edges before you adhere to the front panel
For image spotlights stamp your chosen image on Whisper White card and punch with the 1 ½ inch circle punch, then punch a circle of card using the 1 ¾ inch punch and layer together with glue/tape.
It is a good idea to lay out all your pieces on the card before you glue them.
Once the layers are all adhered, Adhere two of the circles to one side of the card and one to the opposite side using a dimensional on just ½ of the circle
| Letter | Quantity needed | Card dimensions (inches) | DSP dimensions
(Inches) |
Whisper White card |
| A | 1 | 3 ¾ x 3 ¾ | 3 ½ x 3 ½ | |
| B | 6 | 1 ¾ x ½ | 1 7/8 x 5/8 | |
| C | 2 | 1 ¾ x 3 ¾ | ||
| D | 2 | 2 x 6 | 1 ¾ x 5 ¾ | 1 ½ x 5 ½ |
I hope you enjoy making this card
Please shop online with me HERE
Crafty Hugs
Heidi


I do hope there will be a video, the card looks fantastic but I have a learning ingredients disability and written directions do not make sense to me. Following a recipe is a nightmare for me! Hope to see a video of this soon….