Well this has been a roller coaster week emotionally, I was on a management course last week where i was studying from 8 in the morning until 11 at night, so I was tired, I then had my usual busy week at work in my day job, with a lovely class on Tuesday evening where we made the final part of the Sending Love suite projects which I am also doing as an online class. Then I got my exam results and passed, so big relief…however we all came crashing down as my nephew has been admitted to hospital with a cyst tumour! So as you can imagine ~I haven’t actually crafted this week and as a result my blog posts have been lacking detail too.. I will catch up but I hope you will understand that if my written details are not quite as thorough as usual…. and if you are able to offer a prayer for him I would be truly appreciative.
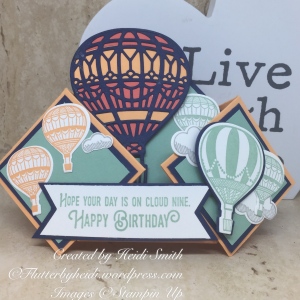
So my butterfly version of this card has proved massively popular, so I have revisited it to make a larger version using the new Lift me Up bundle as the balloon die cut needed a bigger base to balance the card out.
In inches
Card 11 ½ x 5 inches
Score long side at 2 ½ and 9” making a mark at 3 ½ and 6” on both sides
Score on the short side at 2 ½ ”
On the long side mark mark the card on the 2 ½ ” score line at 4 ½ and 7”
Join the marks to form a diamond shape in the centre of the cardstock
Fold from the left mountain, valley, valley, mountain
Hold the edges of the cardstock push towards the middle and the card should form
Panels
Centre 1 needed 3 x 3 inches and a Whisper White layer 2 ¾ x 2 ¾
Side panels (2 needed~) 2 ¼ x 2 ¼ , Whisper White 2 x 2 inches
Reverse panels 2 squares of Whisper White 2 ¼ x 2 ¼
To make an envelope, cut a square 9 7/8 x 9 7/8 and using the Envelope Punch Board punch and score at 4 ¼
In Centimetres
Card 29 x 12 cms
Score long side at 6 and 23 cm making a mark at 11 and 18 on the top and bottom edge
Score on the short side at 6 cm”
On the long side mark the card on the 6 cm score line at 8.5, 20.5 cm
Join the marks to form a diamond shape in the centre of the cardstock
Fold from the left mountain, valley, valley, mountain
Hold the edges of the cardstock push towards the middle and the card should form
Panels
Centre 1 needed 7.5 x 7.5 inches and a Whisper White layer 7 x 7 cm
Side panels (2 needed~) 5.5 x 5.5 , Whisper White 5 x 5 inches
Reverse panels 2 squares of Whisper White 5.5 x 5.5
To make an envelope, cut a square 24.8 x 24.8 and using the Envelope Punch Board punch and score at 10.8 cm
Come back and see me soon
Don’t forget to visit my online shop to buy your Stampin’ Up Supplies
ive also added this to the Skip to my Lou make it Monday link up HERE
Crafty Hugs
Heidi

Gorgeous card. Wishing your nephew a speedy recovery.
love your card. was referred here from another blog and love that your videos are well done and concise and that the measurements are in both forms. thanks so much for sharing. I just began following and look forward to more card ideas. soon as I have some more spare time i’m going to look back on previous posts.
Thank you so much. It is lovely to hear that my tutorials are appreciated, they are not always as professional as I would like, but hopefully you can still follow along!